How to replace your own motorbike fork seals | Save money with this guide from MCN's expert mechanic
A weeping fork seal is never a welcome sight on your bike, particularly in the run-up to your next MoT test, but it doesn’t have to mean an expensive trip to the mechanic.
With the right tools and a little patience, it’s a job that you can do yourself at home and once you’ve learned to remove and refit your forks it opens up a world of opportunity for servicing or upgrades, too.
Depending on what type of bike you have, replacing fork seals is a task than can vary in difficulty. Before starting, familiarise yourself with the strip-down and re-build procedure, as the specific process varies from one model to another.

Once you’re happy, get the machine on a suitable stand so that you can get to work on the front end.
- Bruce’s tip: The Abba Superbike stand is ideal as it lifts a bike from the swingarm pivot.

"The cheaper paddock stands are not particularly good quality, and the Abba stand scores because it is easy to lift the bike and when it is in the air, it is rock solid, giving you the confidence to tackle any job on it.
"You can also use adapters to remove the swingarm – not something you can do with a paddock stand – if you need to, and £20 makes it useable on another bike. It's a great addition to the workshop and made the jobs I had to do not only possible but so much safer and easier."
Read our full Abba Superbike stand review
Pros
- Fits a huge variety of bikes
- Easy to use and safe and stable
- British made
Cons
- Bike tips forward onto front wheel
| Max load | Unknown |
| Construction | Fully welded steel |
| Mounts included | Specific bike mounts included for your model |
- Both wheels suspended simultaneously
- Will not scratch the swing-arm
- No permanent fittings required to be fitted to the bike
Measure the fork protrusion

Before you remove the forks from the bike, measure the amount of fork protrusion through the top yoke – you’ll need to know this when it comes to putting the fork legs back in. Take the measurement using a Vernier or steel ruler. When you’ve done this, loosen the fork cap by half turn, as it will be easier than doing it later when it’s off the bike.

"I’ve been squinting like Mr Magoo at an ancient version of this that only boasts markings for years, and finally conceded that a new caliper with a digi readout would be a massive improvement. And it really is.
"This dual-reading tool displays both types of readout, and also measures inbound and outbound, allowing a wide range of measuring applications – with complete accuracy. The measurement range is from zero to 150mm/6in, in 0.01mm and 0.005in increments, which covers the vast majority of measuring need for workshop jobs.
"The slider has a thumb-wheel and a lock. The tool is made from hardened steel, so it’s super-sturdy and should last a lifetime. The battery is an easily-available SR44 (included), and the auto-off feature means you won’t need a new one every time you use it! It’s also supplied in its own hard case, meaning you can store it safely in your tool chest without fear of damage. While Draper’s RRP is over £50, I bought mine on Amazon and paid £23.89."
- Bruce’s tip: Note the position of handlebars if they are the adjustable type.
Strip for access

Remove any items that prohibit access to the fork pinch bolts and subsequent removal. Lay any components that you remove neatly to one side in an order that makes it logical for reassembly – you’ll need to remove the brake calipers and front wheel. This classic 1980s Suzuki GSX-R750 also needs to have the front mudguard with its built-in fork brace removed.
Loosen the bolts

Now you are ready to loosen the pinchbolts on the top yoke and handlebar clamp – there is no need to remove them completely. Next undo the bottom yoke bolts. Support the fork leg with your hand as you loosen the last one just in case it falls through (in most cases, the fork will sit tightly in the yoke so you’ll need pull and twist it to coax it free).
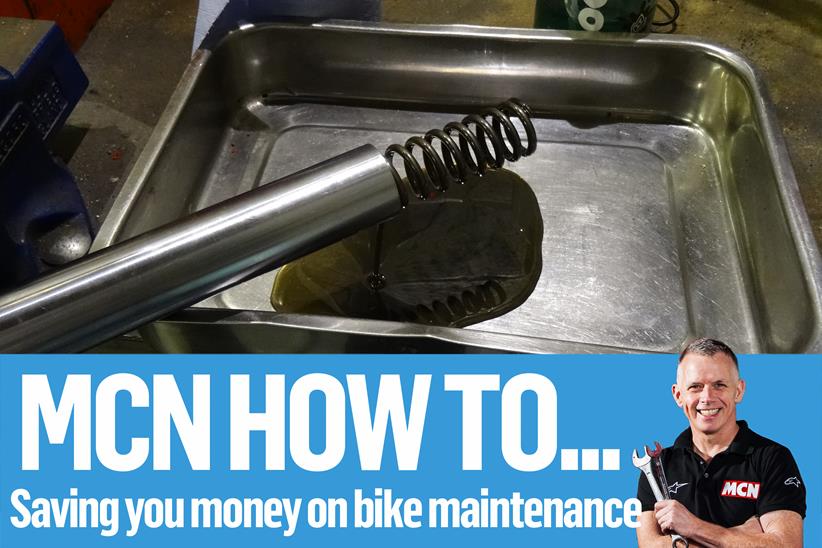
Drain the old fork oil

You’ll need a tray to drain oil into. Secure the fork leg in a vice, using soft jaws. Begin to unscrew the cap – be prepared for the spring to pop it out. Remove the spring and any spacers then upturn the fork to drain the oil away. Leave it upside down until the oil has drained.
- Bruce’s tip: Reduce the fork preload setting to minimum prior to cap removal.
Remove the old fork seals

Undo the Allen bolt at the bottom of the fork leg and drain away any residual oil. Gently prise the dust seal out, then remove the clip that locates the seal. The fork leg and stanchion can now be separated. Remove the fork seal by prising it out with a suitable lever.
- Bruce’s tip: You’ll often need a special tool to undo the Allen bolt on the fork leg.
Give everything a good clean

Spend time cleaning all the components, wipe away dirt and grime and look for signs of wear and damage. Inspect the fork stanchions for pitting or damage, and give the inside of the fork leg a good blast with brake cleaner then make sure it is completely dry.
- Related: Best motorcycle cleaning products
Get the right replacement parts
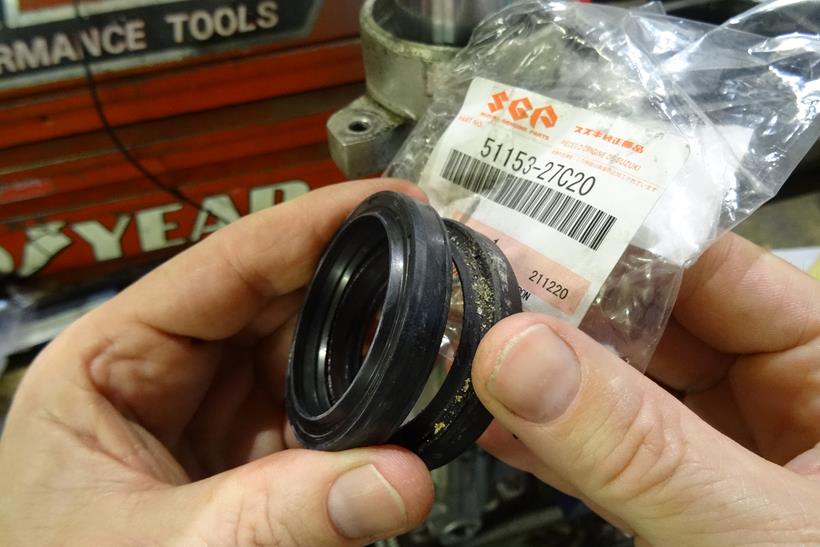
Check the seals are correct. Fit the new seal facing the right way up, make sure washers/spacers are in place. The seal should be driven in with a fork seal driver, but you can use a blunt drift. Just make sure it goes in square until the retaining groove is visible.
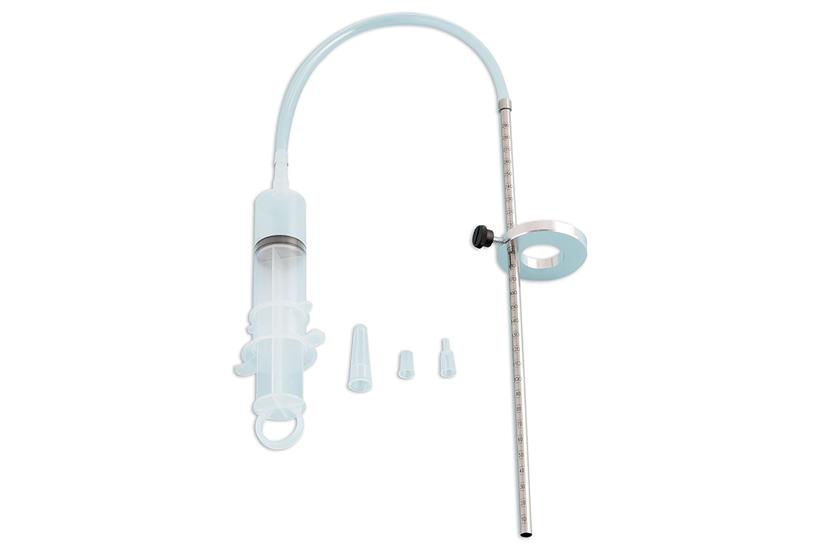
Refill the oil to manufacturer spec

Re-assemble the upper and lower fork stanchion. Refer to the manual for the correct type of oil and amount needed – usually it needs to be measured without the spring in place. Pour the oil in and then open and close the forks to make sure that the oil has filled the leg and there is no trapped air. Check the air gap with either a ruler or height tool – the figure will be in the workshop manual.

Re-install in the innards

Gently lower in the spring, then fit spacers and washers in order. You’ll need to extend the fork so that it can accommodate all the parts. Hold the fork in the open position to fit the cap. Refit each leg back into the correct side, set the fork protrusion, then torque up the pinch bolts, caliper bolts and wheel spindle to the correct values. Finally, give the fork caps one last tighten.
- Bruce’s tip: Make sure you install the spring the right way up
Make sure you get the right fork oil

Not all fork oil is equal. An oil’s grade will often be quoted as a 5W, 10W or 15W in a manual, and it’s quite logical to assume that all fork oil sold with a SAE 5W, for example, will have the exact same viscosity properties from one brand to the next.
Strangely, it’s not like that at all. When you look closely at the details of the various 5W fork oils available you’ll see there is a wide margin of viscosity values between them. So much so that some 5W oils could be 7.5W!
Which is why you need to look in the workshop manual to find the exact oil recommended by the manufacturer. Quite often it’ll be a specific brand and type, but most of all you need to look for the Centistroke (cSt) value.
Key to selecting the correct fork oil for your bike, the cSt scale is a more accurate viscosity rating that can be compared between brands. I did a quick check online and found that several different brands shared the same spec, Suzuki L01, Yamaha KYB01, Castrol Fork Oil 5. Check out Transmoto’s handy conversion table for a handy ready reckoner between the brands suitable for your bike.

